


Recently, our family moved from the Northeast to the Northwest - and it has been an adventure! In a whirlwind decision we packed up and moved our family in three short weeks - and we're still settling in.
Part of the deal with moving of course, is clearing out (I know lots of people who consider moving the perfect time to do a household purge, and we were no different).
Some of the things that have stuck with us though, are the sentimental items my husband and I have had since childhood. Including a whole bunch of t-shirts.
T-shirts are one of those things that seem to accumulate quickly, and often rotate in the wardrobe. When I started pulling out a bunch of shirts from my childhood I decided I didn't want them sitting, unworn and forgotten in a tub any longer. I took the plunge and cut them all up to make myself something useful - a sweet t-shirt quilt!

The process was a bit difficult, but I'm going to attempt to document how I made it, in case you'd like to make your own!
I started out by cutting the logo/picture/patch/whateveryou'vegot from each t-shirt, leaving as much plain t-shirt border to work with as I could. You can see below how much white space I left around the picture.

If there was something small on the arm or on the back, I cut that out too...

Before trimming anything, I ironed interfacing onto the back of each piece. This does make the whole quilt a little bit more stiff, but it is SO much easier to work with! After I had the interfacing on, I didn't have to worry about the t-shirt material stretching while I cut it or sewed it. I'm glad I used it!
I had the hardest time picking out the interfacing. If you've ever tried to purchase it at the fabric store, you'll know what I'm talking about. They had about 30 bolts and I sat staring at them for about 30 minutes. Ultimately, I chose something that felt like medium weight and hoped for the best.
It was Pellon, 950F, Apparel Interfacing. It worked great :)
Update: I'm working on another and this time I picked 906F Fusible Sheerweight, also by Pellon. It is not quite as thick, but still keeps the fabric from stretching while I sew it. I think I like it better!

Now comes the interesting part.
Since I didn't make all my squares uniform size, I had to do a lot of math. A LOT. My brain hurts just thinking about it.
Below, you can see some of the papers I used to keep everything organized. The large paper on the bottom listed every single piece of t-shirt individually, and information about it.
The paper on top was a pattern I made in power-point. I zoomed out to 10% and made square shapes on the computer that were the actual size of the piece of t-shirt I was working with.
Here's the process, from the very beginning:
1) For each t-shirt piece:
- Use a numbered list
- Next to each number, write some identifying information about the t-shirt piece so you'll know which is which, then
- Measure the t-shirt piece and write down the minimum and maximum dimensions it could be cut to. Make sure, when writing the maximum or minimum size it could be, that you consider the seam allowance (so leave at least a 1/2" border when measuring the maximum size).
2) Using powerpoint if you have it (could be done in Word too), use the shape tool to make rectangles. I numbered each rectangle on the computer to correspond to a number on the list.
3) Starting in a corner, arrange the rectangles. Check your numbered list to size the rectangles based on the t-shirts you have. Adjust the size of the rectangles on the computer to make them fit together, and fit the size t-shirt pieces you have.
(Warning, this took me a LONG time). It requires checking your numbered list for a t-shirt the size you need. Then, making them fit - moving things around when you run out of pieces small enough to fit. You could supplement with small blank t-shirt squares if you absolutely have to fill a hole. But I found that the small logos I took off of the arms worked really well to fill in the tiny gaps. Make a check mark next to the number on the list once you have used that t-shirt in your pattern.

Below, you can see a screen shot of my powerpoint pattern. To help, I even made rectangles the same color as the t-shirts, so I could make sure I was arranging the colors in a way I liked.
4) Once I had my pattern finished, as seen below, I re-wrote my numbered list and wrote down the final dimensions of each piece based on the size of the rectangle in powerpoint. Remember, I made each rectangle to scale, so when I clicked on one, I could see the exact size (for example: #5 was 11" x 13").
I also checked my work multiple times! I made sure that if I added up the width across the top, it matched each "row" of squares all the way down the quilt. Same with the "columns." I put those words in quotes because there are no exact rows and columns. So I went across or down in the best way I could to make sure the width always added up the same and the length always added up the same. It is easy to be off by 1/2" when trying to align the squares in powerpoint. (See where the math can start to hurt your head? You just wait...)

Here's another picture of a t-shirt quilt pattern I made later. I typed in the dimensions as well, which helped!

Here is the really important math step!!
5) Take your numbered list (which should show the size of each t-shirt square) and make a new column to add in seam allowance!!! The powerpoint pattern does not take seam allowance into account. EVERY SQUARE needs to have seam allowance added to the length and width. I decided to use exactly 1/2" seam allowance, so I added 1" to the length and 1" to the width of every square.
Here's an example of my list:

Then, you start trimming your t-shirt pieces. Find piece #1, and cut it to the correct size (the size with the seam allowance factored in), and do this for all the pieces.

6) Once all the pieces were trimmed with the correct seam allowance, it was time to sew them all together. Carefully using my pattern (which I printed out using a screen shot) I started sewing small sections together.
Take a look at my powerpoint pattern again:

Then I sewed #26 and #26b together, and added it to the #5 piece, which was sewn to the other 3 pieces. (you can see what I mean below)
If you look carefully, do you see the process?
Next came #4 with #24. Then added those to #6.
Next #40 with #45. Then added to #43. Then added to #42. Etc. etc.


Small section after small section I sewed together, careful to use the exact 1/2" seam allowance I had allotted myself. Then, I sewed those smaller sections together to make bigger sections. Almost the entire quilt I was able to find exact sections to sew together (meaning I could match up two entire edges perfectly). Only once did I have to sew an intersecting piece half way through another square. It required me to think it through, but if I was careful I could almost always sew full pieces together.


Here is the first half of the quilt sewn together...

And the other half...

And finally, here is the completed quilt!
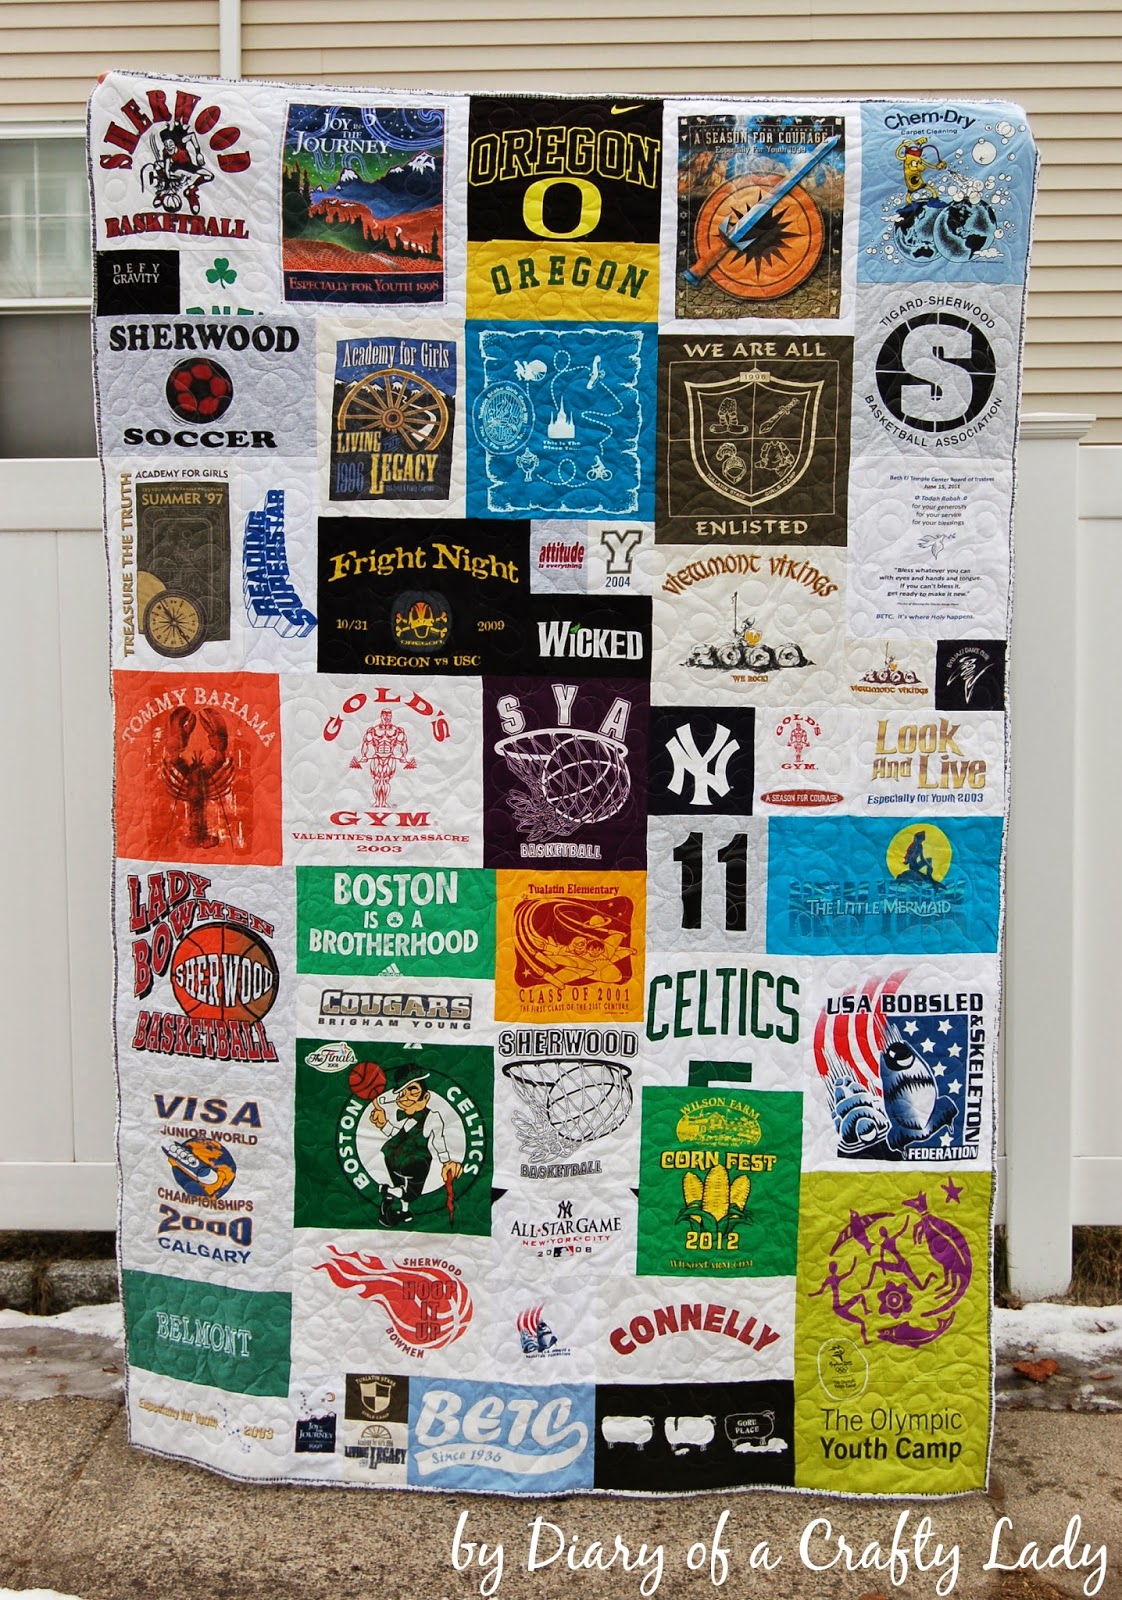
We used a simple, swirly pattern to quilt it, so as not to detract from the t-shirt designs. I used a flannel for the backing, which makes it soft and warm. I did use the thin, natural cotton batting in between the tshirt top layer and the flannel backing layer. The quilting machine could handle all those thick layers - but just barely :)

I am completely in love with the way it turned out! It represents many wonderful memories, and there is even a t-shirt all the way back to my elementary school days!

I have seen quite a few t-shirt quilts, and I have always admired them. It was a huge challenge to have all different size squares, but I love having everything packed together, cropped tightly, and I love that this quilt is so unique! No one will ever have another one like it, which makes it that much more special. My husband has already started gathering his t-shirts so that I can make another - and I have to admit, despite the hard work (and the endless math), the idea of making another one sounds fun ;)

Follow me on Instagram @ diaryofacraftylady
Follow me on Facebook


love this layout for the quilt. I would love to know the actual size of each block that you cut out. kmttjudy at hotmail dot com
ReplyDeleteWhat has your government done to help save you from your financial instability? you strive to survive and yet you hear stories of how your leaders have become terror in your entities... is time to make a different. for will have made money, and we have also come to help you out from your long time of financial suffering. clearing of credit card is made available, software for hacking ATM machines, bank to bank hacking and transfer, change your school grade and become something useful in the society. we also have other form of services such as Facebook hack, whats-app hack, twitter hack, i cloud hack, tracking of smart phones, hacking CCTV, installation of software on desktop and PC, snap-chat hack, Skype hack, wire wire, bitcoin account hack, erase your criminal record and be free for ever. database hack and many more. e-mail: cyberhackingcompany@gmail.com for your genuine hacking services and we shock we your findings.
DeleteI love your quilt! Two questions: 1. did you use a batting between your flannel back and your tshirt(s) front? 2. when sewing the "swirly pattern", did you sew through the tshirts and flannel backing? I am confused on the quilting part of the quilt. Thanks!
ReplyDeleteHi Crafty ;)
DeleteYes, I did use batting between the tshirt top layer and the flannel backing. When I load it onto the quilting machine it stretches the tshirts, batting and backing/flannel very tight, and then the stitching IS done through all the layers. It is quite thick, but I use the natural 100% cotton batting which isn't as thick as some you can buy. Hope this answers your questions. Let me know if you have any others. Good luck!
Thanks so much for this great tutorial! I have wanted to make one of these for each of my Grandkids for a while now. Well, now I can , thanks to you! Yay! They will be so surprised...now to let their Moms in on my secret......I need those t shirts?...:)
ReplyDeleteThanks again. Have a fantastic day.
Hugs Marg
How did you make the powerpoint squares to scale?
ReplyDeleteHi Lacyjane,
DeleteFirst, set the zoom in your Powerpoint to about 10 percent.
Click Insert>shape and select a square shape.
After you've inserted the shape, click the Format tab across the top, and you should see the Height and Width section, where you can adjust those dimensions to whatever you'd like.
I set mine to how ever many inches my actual pieces are.
Hope this helps! Good luck,
Lindsay
You have answered my prayers! I am making my son a quilt. I have already made 3 other t-shirt quilts but they were pretty straightforward with their design. This one I want to make more random with the size of squares and placement and it has been stressing me out. I've tried doing it with graph paper but it is not easy to move things because then you have to completely erase everything else. I've been looking online for a program to help set it up for me but the only ones I've found are for regular pieced quilts with the same shapes and sizes. After reading your blog I decided to use photoshop. I've got all the pieces made and am now making the pattern. This is a lifesaver! Thank you so much!!
ReplyDeleteNiki, I am so glad! What a nice comment. This sure makes me happy. Good luck with your quilt!
DeleteLindsay
WOW, can I say it again? WOW. Your math skills -patience- insight- skill of execution- all of it are amazing. I am making a quilt for a friend that lost her 7 year old son. The shirts are all from the annual 5k run they do in his memory. The money raised goes to a student for a college scholarship.
ReplyDeleteI hope my quilt comes out even half as good as yours.
Kristi,
DeleteWhat a very nice compliment, thank you! Good luck on your quilt. What a wonderful service you are doing - I'm sure it will turn out great!! Let me know if I can answer any questions for you :) Best, Lindsay
I'm not familiar with Power Point. How do you enter the rectangle sizes in Word? When I tried to make a pattern in Word and created shapes equivalent to the actually fabric sizes, the rectangles were huge and took up the entire document. When I zoomed out to 10%, the document was so small that I could not work with it. I must be missing something...???
ReplyDeleteOk, so if you can use Power Point, you should do that. If you are familiar with Word, you should be able to navigate and do the few things you need to for this project.
DeleteWhat I did not realize, is that if you use Word, you can not go outside the page width to arrange your squares. And the widest that you can make the page is 22", which is not big enough. If you must use word, you will have to make your squares some fraction of their actual size - which makes the math sound even more mind boggling to me! But, you could do a combination of Word and drawing it out on paper to check your work.
In Powerpoint, you can go well outside the page width, and have plenty of space to arrange things, making your squares actual size.
Good luck!
Lindsay
I found your t-shirt quilt tutorial today. I really like your completed quilt you show here and would like to mimic it. I'm not great with sewing or math but want to attempt to make my son one. Do you have the measurements on a chart or list still? It's a little rude to ask since you went through so much work, but in my mind I could prepare and cut my t-shirts to fit those measurements that you did exactly and it would turn out similar in layout and size. It would spare me re-doing what you've done. Does that make sense? To be honest I'm sure I could do what you did. So I'm hoping to just copy. Is that fair to ask? I can see that information for one of the other quilts you've made, but I like the size of the first one a little more. I'm totally looking for a free ride here if you happen to have that info and are willing.:) Thanks so much.
ReplyDelete:) Thanks for your honesty. I'm happy to share what I've got. Why don't you email me at craftyladylindsay at gmail dot com and I'll email you a few files that might help.
DeleteThanks,
Lindsay
I love your quilt. I have always made mine with blocks that matched up, but now I'm trying a random-size quilt. My question is: how do you make the seams when the blocks meet in an inside L-shaped corner?
ReplyDeleteThis is so cool. It makes fitting the pieces easier with a plan. Working on creating a couple.
ReplyDeleteWonderful! Good luck!
Deletehey Lindsay! loved this post; however, when trying to use power point, it would change the size when I tried to change the shape to 10%??? Can you help me understand?
DeleteI found this blog after a long time which is really helpful to let understand different approaches. I am going to adopt these new point to my career and thankful for this help.
ReplyDeleteโรงงานผลิตเสื้อยืด
This is great! When I did the power point and adjusted the scaling to 10% it changed the height/width. How did you overcome that? I'm still a beginner, and also, how would you draw it out to scale?
ReplyDeleteHi Lindsay, I'm relatively novice at quilt making, although I'm more than a basic seamstress. I'm considering making a quilt using varying sized squares too, and I must say, I agree with Rachel, from Mar 17, 2017, who asked for your list of sizes. Are you still willing to share those measurments? I will pay you if need be. I lack the skills to use power point efficiently and would most likely end up doing the configurations by hand. Thank you for your assistance! Sincerely, Deb Krysa
ReplyDeleteVery informative, good job guys and thanks for sharing such a awesome blog. Business promotional items Calgary Alberta
ReplyDeleteEmbroidery services Calgary Alberta
Lindsay - I thoroughly enjoyed reading through this blog - you are amazing! I, too, have been creating t-shirt quilts but have shied away from creating a quilt that was not consistent in the sizes of rows and columns. I have PowerPoint but I do not know how you can tell the size of the square or rectangle you create when you place it within the slide. Can you help? I would very much appreciate it!
ReplyDeleteSharon Costedio
Lindsay - I read through your above replies and do not understand what you mean by set the zoom at 10%. Could you clarify? I believe once I am able to get through that step I will be good to go! Thanking you in advance.
ReplyDeleteSharon Costedio
Please share more like that. hashtagme appeals
ReplyDeleteI admire the valuable information you offer in your articles. Thanks for posting it. stock tips
ReplyDeleteThanks for your knowledge sharing with us. I learnt many new things from this post.
ReplyDeletePromotional T-Shirts
Environmentally Friendly Promotional Products
Great post, and great website. Thanks for the information! women's activewear
ReplyDeleteThis is really a nice and informative, containing all information and also has a great impact on the new technology. Thanks for sharing it, Klasströjor
ReplyDeleteSuch an awesome post.ThanksBest screen printing in Calgary Alberta
ReplyDeleteInstant embroidery Calgary Alberta
Awesome article! I want people to know just how good this information is in your article. It’s interesting, compelling content. Your views are much like my own concerning this subject. womens distressed sweatshirts
ReplyDeleteThis is really a nice and informative, containing all information and also has a great impact on the new technology. Thanks for sharing it yoga pants for women
ReplyDeleteI found this blog after a long time which is really helpful to let understand different approaches. I am going to adopt these new point to my career and thankful for this help.
ReplyDeleteเสื้อ ยืด ลาย ไทย
Nature always helps a writer to learn from its elements. Nature always try to teach new lessons and a writer transform its experience into words. He can transform even silence into words. This blog taught me a lesson.
ReplyDeletecreate your own shirt
Such a good information I really appreciate sharing this great post...
ReplyDeleteClear Frame Glasses
Punk Goggles
You can buy a good and reasonable priced quality leather jacket here : leather addicts.
ReplyDeleteThat is a good tip particularly to those fresh to the blogosphere. Short but very accurate info… Many thanks for sharing this one. A must read post!
ReplyDeletetailor tucson az
Wow! What a lovely idea! I love this idea of printing. I really enjoyed this article. Amazing printing style and I really like your writing way. Thanks, dear for sharing such an interesting and attractive article. Read more about top 5 reasons why t-shirt printing are important as promotional gifts .
ReplyDeleteThis comment has been removed by the author.
ReplyDeleteT-shirts are symbolic expressions. They can spread ideas or messages, evoke laughter or express team spirit. Online t-shirt design services provide an easy way for people to create unique and custom design outfit that can include one's own logos or sayings. They help the customers in getting the exact shirt they require. Typography t-shirt design
ReplyDeleteThanks, For sharing such a beautiful piece of information,You don't how much this article can help me.Bachelorette Party T-Shirts
ReplyDeleteYeah, it was great I really enjoyed this article. I'll try to make some of these. I really enjoyed your craft. xoxo
ReplyDeleteNew Born Babies Clothes
Oh Great! Very nice,Keep it up and have to visitTacos and Tequila
ReplyDeleteThank you! Thank you! I've been saving my daughter's tshirts for years - she is about to graduate from high school - and this the best set of instructions I've seen about how to deal with all of the odd sizes of logos. I'm inspired!
ReplyDeleteT-shirts are also to look nice and to share some nice messages by printing it in form of quotes to the front of the T-Shirt. That was awesome seriously great.
ReplyDeleteI'll also try to do so. Want you to give some inspirations regarding jewellery like earrings, bracelets, etc from Gold hip hop earrings| MajesticVUE. .
Thanks really enjoyed it.
https://ohjoy.blogs.com/my_weblog/2012/10/how-id-wear-a-patterned-skirt-1.html#comment-6a00d8341c6a0853ef0240a51c5ade200b
ReplyDeleteVery Informative write up keep it up as you go ahead by visit Bluehost Reviews.
ReplyDeleteAll the fabric and clothing ideas are fascinating.
ReplyDeletewe are providing services in Pakistan for tracking phone number , sim database online and live tracker in Pakistan.
50+ Print Ready and 100% Editable Christmas T-Shirt Design Bundle. This bundle will make your t-shirt selling store and t-shirt designs stand out like never before.
ReplyDeleteThis bundle has 50+ premium unique designs in editable vector and printable formats that are perfect for t-shirts, hoodies, mugs, and flyers. This editable and pixel perfect vector files you can adapt these t-shirt designs to any size. This Bundle Helps you to grow your online store. If you have an online t-shirts business this bundle can help you. This bundle is a fully new edition.
I really like your article, it is very helpful for me. You also have to visit Bachelorette Party US a good online t-shirts store.
ReplyDeleteThanks for providing such a good piece of information. I don't read any article like this before. The information providing about shirts is very helping for me. Check out for our blue tuxedo and grey tuxedo as well at Menstuxedousa.
ReplyDelete50+ Print Ready and 100% Editable Halloween t shirt design bundle. This bundle will make your t-shirt selling store and t-shirt designs stand out like never before.
ReplyDeleteReally a nice piece of information. Keep posting such informations.
ReplyDeleteAnd also visit my website
https://www.softicnerds.com/
https://www.softicnerds.com/web-development-services/
https://coviddisease2019.blogspot.com/2020/10/covid-19-disease.html
Really a nice piece of information. Keep posting such informations.
ReplyDeleteAnd also visit my website
Softicnerds
Digital Marketing Agency
Web development services
Covid - 19 Latest news
Thru Wall
ReplyDeleteAir Conditioner
Travel Trailer Air Conditioner Units
Auto Air
Conditioner
Dyson
Air Conditioner Reviews
Upright
Window Air Conditioner
Slider
Window Air Conditioner
15 000 Btu
Air Conditioner
As Seen
On Tv Air Conditioner
Energy Efficient Air Conditioner Unit
Smallest
Btu Air Conditioner
You have written a fabulous information and I appreciate you for this fantastic effort and Please keep it post such a valuable stuff for us.
ReplyDeleteI have a Organic Oil for your baby skin and MOMs also with 100% satisfaction and discounted prices.Baby Oil
You are writen up an amazing stuff of interesting information that help me a lot and I supposed to get this type of information well be delivered constently. If someone is searching for a quality Mens clothing,Womens clothing,vneck tshirt men,white tee shirt,mens wedding attire,mens crew neck sweatshirts for daily use and event base that https://luxwayz.com is a perfect online store for mens and womens clothing and accessories.
ReplyDeleteWhat would you recommend for a beginner who's never made a quilt?
ReplyDeleteYou are such a great blessing to me. This is so wonderful. Thank you so much. I have two kids that are navy commanders (a boy and a girl) and they both handed me bags of tshirts to turn into a memory quilt for them. I’ve already decided to make one side from their navy shirts and the reverse side for their schools. Wish me luck!!
ReplyDeleteWelcome to the future! Financing made easy with Prof. Mrs. DOROTHY LOAN INVESTMENTS
ReplyDeleteHello, Have you been looking for financing options for your new business plans, Are you seeking for a loan to expand your existing business, Do you find yourself in a bit of trouble with unpaid bills and you don’t know which way to go or where to turn to? Have you been turned down by your banks? MRS. DOROTHY JEAN INVESTMENTS says YES when your banks say NO. Contact us as we offer financial services at a low and affordable interest rate of 2% for long and short term loans. Interested applicants should contact us for further loan acquisition procedures via profdorothyinvestments@gmail.com
We invest in all profitable projects with cryptocurrencies. I'm here to share an amazing life changing opportunity with you. its called Bitcoin / Forex trading options, Are you interested in earning a consistent income through binary/forex trade? or crypto currency trading. An investment of $100 or $200 can get you a return of $2,840 in 7 days of trading and you get to do this from the comfort of your home/work. It goes on and on The higher the investment, the higher the profits. Your investment is safe and secured and payouts assured 100%. if you wish to know more about investing in Cryptocurrency and earn daily, weekly OR Monthly in trading on bitcoin or any cryptocurrency and want a successful trade without losing Contact MRS.DOROTHY JEAN INVESTMENTS profdorothyinvestments@gmail.com
categories of investment
Cryptocurrency
Loan Offer
Mining Plan
Business Finance Plan
Binary option Trade Plan
Forex trade Plan
Stocks market Trade Plan
Return on investment (ROI) Plan
Gold and Silver Trade Plan
Oil and Gas Trade Plan
Diamond Trade Plan
Agriculture Trade Plan
Real Estate Trade Plan
YOURS IN SERVICE
Mrs. Dorothy Pilkenton Jean
Financial Advisor on Bank Instruments,
Private Banking and Client Services
Email Address: profdorothyinvestments@gmail.com
Operation: We provide Financial Service Such As Bank Instrument
From AA Rate Banks, Cash Loan,BG,SBLC,BOND,PPP,MTN,TRADING,FUNDING MONETIZING etc.
This is really a nice and informative blog.Mountain Warehouse coupon code
ReplyDeleteGreat read, thanks for sharing. I found it very informative.
ReplyDeleteCadbury's chocolate discount code
Thanks for the information. I really like the way you express complex topics in lucid way. It really helps me understand it much better way.
ReplyDelete#safety vest singapore supplier