This is another one of those projects that, when finished, I am absolutely in love with! I feel like in this particular case, the pictures can't even do it justice. It is so cute in person!
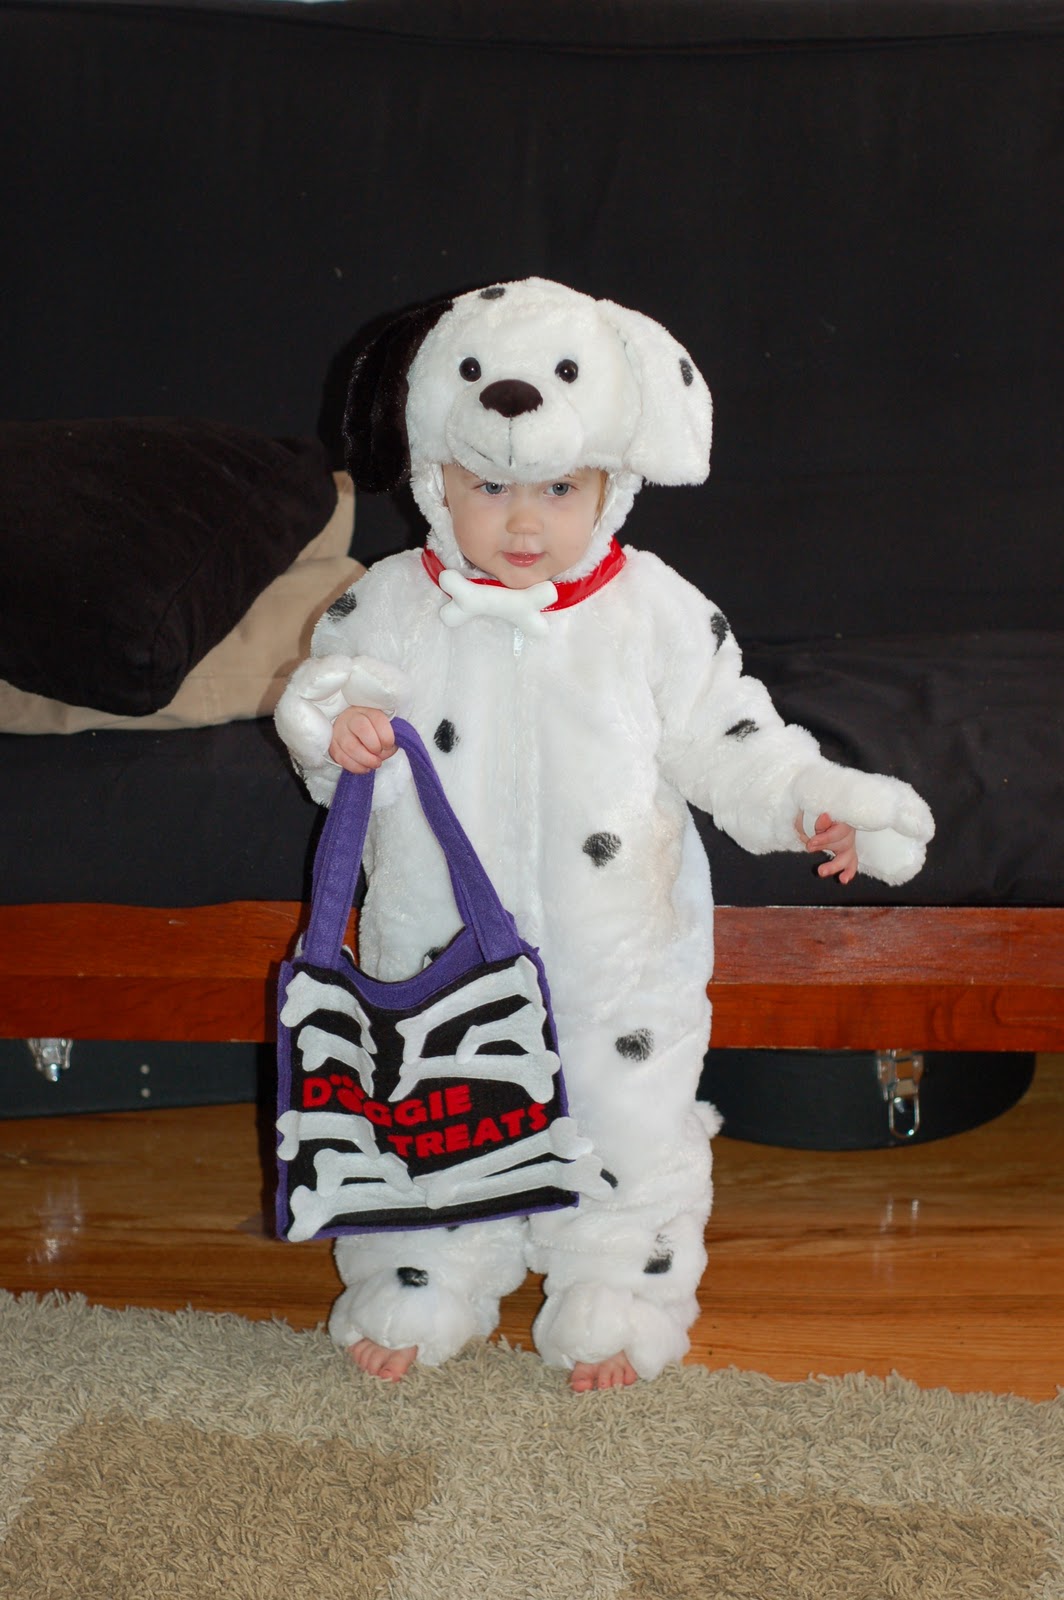
My youngest daughter LOVES dogs. So, when we found this doggie Halloween costume a few weeks ago, we knew we had to get it for her. She loves wearing it already - and she looks adorable.
Since I didn't get to make her costume, and it doesn't really need any embellishment, I decided that I would make her a candy bag to match.
I made this one a "Doggie Treats" bag --- but you could make it into any kind of treat bag - whatever fits your costume!
A couple of years ago, I made a
felt trick-or-treat bag for my older daughter, to match her
Oregon Duck Fan outfit. It was pretty amazing, but I made a couple of improvements from that one when making this one.
I knew I wanted to make a bag with dog bones on it. My husband told me that it would be funny to call the bag
"Doggie Treats" - because of course the bag has Halloween Treats in it
...just a tiny pun.
What I didn't anticipate, and another thing that I really love, is that my
dog bones turned out looking like
skeleton bones, which makes the pun that tiny bit funnier:)
HERE IS THE TUTORIAL:
I used felt - which I got from the roll at the fabric store. It is made with recycled bottles, and is pretty thick and sturdy.
For my bag, I decided to make the outside front and back black, and the inside and sides purple.
Fabric Needed:
4 - 9"x9" Squares of Felt (outside front and back of bag, plus inside front and back of bag)
2 - 3.5" x 27" rectangles of felt (this long piece becomes the sides and bottom of the bag)
4 - 1.5" x 14" rectangles of felt (these become the handles)
Scraps and pieces for embellishment
I cut 2: 9"x9" squares of black felt, and 2: 9"x9" squares of purple felt. The bag is made entirely with doubled up felt.
I also cut 2 long pieces of felt, 3.5" wide by 27" long (the same length as the three sides of the square added together). These pieces become the bottom and sides of the bag.
You will want to embellish the front and back of your bag before you sew it together.
Whenever I make letters, I start by printing bold letters off on my computer. Then I cut them out, trace them onto felt, cut the felt out, and sew or fabric glue the letters down.
Of course, embellish with any design you can think of!
For this bag, I cut white felt to look like skeleton bones.
Embellish the front and back of the bag before sewing the bag together (making sure to leave 1/4" from the edge clear for a seam allowance).
On this bag, I only stitched along the straight part of the bone, as shown. By leaving the ends un-sewn, it added a very cute 3-D aspect.
 |
| The red lines show where I sewed |
If you also want a design on the side of the bag, now is the time to do it. I did add bones to the ends of one long strip, so that the sides of the bag would be decorated too.
To sew the bag together, take 2 square pieces of felt (one outside piece, and one lining piece) and put them together, right sides out (wrong sides together). For me, this meant the front of my bag, with one of the purple inside pieces.
Take the 2 long pieces of felt, right sides out (wrong sides together). Line up the edges, as shown, and them pin them right sides out (wrong sides together).
 |
| Before it gets pinned |
 |
| After it has been pinned, looking at it from the front |
 |
| After it has been pinned, looking at it from the back |
Sew along the edge, using 1/4" seam allowance. Stop 1/4" from the end. Note: the seams will be facing OUT.
Then, pin the bottom edge of the bag to the long strip, right sides out (wrong sides together), and sew along the bottom edge. Stop 1/4" from the end of the bottom edge.
Finally, pin the 3rd side, right sides out (wrong sides together), and sew with 1/4" seam allowance all the way to the top/end.
 |
| Looking at it from the inside |
 |
| Front and sides sewn together! |
Do the same for the other side of the bag. Pin in place, along all 3 sides (2 sides and bottom) and sew with 1/4" seam allowance. Again, seams will be facing out.
For the handles: I sandwiched 1 piece of 1" thick grosgrain ribbon between 2 pieces of felt. I make my felt handles 1.5" x 14" - but you decide how wide and long you want your handles.
Sew across one short edge - catching the ribbon and 2 felt pieces. Then, sew down the 2 long edges, 1/4" from the edge - keeping the ribbon hidden inside.
To attach the handles to the bag: Put the ends of one handle in between the pieces of felt on one side of the bag, (both ends of the handle go on the same side of the bag), close to the edges/sides of the bag. Pin them in to hold them in place while you finish sewing.
Once the handles are place, sew the handles down securely, between the 2 pieces of felt that make up the front of the bag. Do this on the front, and the back. (You can also wait to fortify them as in the picture below until after you have sewn around the entire top of the bag - see next step).
The only thing left to do is to sew the top closed. Sew all the way around the top of the bag, with 1/4" seam allowance.
Your bag is finished!!
 |
| Front and Side |
 |
| Back |
Kids often want to pick out their own costume, so making a trick-or-treat bag gives you the chance to add your own personal touch. It is easy, fun, and SO ADORABLE!!
Happy Halloween!!
Check out my other versions too:
I am linking up to: